
Growing Tomatoes
Tomatoes are such a versatile crop to grow with thousands of varieties, shapes, flavors and textures. I use tomatoes in many meals throughout a week. Plus, tomatoes are one of first things I learned how to can. Growing tomatoes can be a beginner garden crop. They grow almost everywhere and can supply you with mountains of fresh produce during the summer and fall. Learn how I start tomatoes from seed and how I manage the growing season to harvest.

Types of Tomatoes
There are many types of tomatoes but I like to break it down to 3 main groups. First group are small, cherry like tomatoes. They are also called grape tomatoes. Most of these type like to grow long vine like (indeterminate) branches that seem to never end. They will have a cluster of small tomatoes (6-12) that grow together on the branch. These cherry tomatoes need a lot of support and benefit from a trellis system. Pruning cherry tomato branches control the stem and allows it to grow in a straighter line.
Second group are paste tomatoes. The paste tomatoes are medium and mostly oblong shaped, like a Roma tomato. They can be used for slicing but best for tomato sauces because of their thick, meaty flesh. These paste tomato plants grow both in bushy (determinate) and vine (indeterminate) ways. I read the package or look up which variety I get. But in general, paste tomato plants seem to be more compact compared to other tomatoes. Pruning paste tomato plants are not always necessary, removing the suckers help control the overgrowth.
Third group are slicing tomatoes. Slicing tomatoes are usually big and juicy. Perfect for sandwiches and diced tomato recipes. These slicing tomatoes tend to be more on the bushy (determinate) type. Having a lot of all around support works best for these plants. I will use a stake, heavy duty cage, or trellis system with rope. The branches will develop 3-4 large tomatoes per grouping. I will always remove the suckers off this type because they have the ability to get huge and over grown within a matter of a few days.
Why I Grow Tomatoes
I grow many tomatoes and often collect tomatoes from other people. I love all the varieties, tastes and textures. I personally grow over 30 plants per year. I eat the tomatoes fresh and enjoy making fresh sauces and salsas during the summer. When I have collected enough to can at least 5 jars, I preserve them.
When to Grow Tomatoes
In zone 5, we can grow tomatoes outdoors from May to October. I start my seedlings indoors in March or winter sow seeds in April. Tomato plants do not tolerate any frost without proper protection. If there is a plant outdoors, bring it inside during frost warning or cover it with a frost sheet. I will not transplant my tomatoes until May 15th or later because I do not risk the frost.
Tomato plants can take 3 to 5 months to produce fruit. Look at your variety and try to time out short season, mid-season and late season to prevent the overwhelm of too many tomatoes at the same time. Sometimes August can be a busy month for tomatoes to be ripe.
Where to Grow Tomatoes
Tomatoes grow best in fertile soil because they take up a lot of nutrients. They need full sun or at least 8 hours per day. Tomatoes grow well next to garlic, onions and peppers. Also planting basil, borage, dill or fennel next to tomato plants helps prevent pests. Borage and basil are my favorites. Tomato plants require a lot of water but do not like soggy soil.

How to Grow Tomatoes from Seed
For winter sowing, plant 6 seeds per milk jug. Visit wintering sowing page for more info.
To start seeds indoors, start by visiting seed starting guide to get supplies and information on the way I grow indoor seeds.
Gather together containers with bottom trays, soil mix, water, reusable plastic wrap, and grow light.
Fill containers 1/2 inch from the top with wet soil mix and place in the tray. Plant 1 seed per single cell (1 inch x 1 inch) container or 2-3 seeds per 2 x 2 inch container. Cover with 1/4 inch of soil mix. Mist the top with water. Cover with plastic wrap. Place the tray of containers under a grow light 2-3 inches away or a very bright sunny window. Turn the containers as needed to prevent leggy-ness.
Once seedlings emerge, remove the plastic wrap to reuse for another seed starting tray.
Bottom water the seedlings when soil is dry. Use a fan for good air circulation when needed.
Raise the grow light up as the plant grows up.
If the plant is getting too big for the container but it is not warm enough, separate and transfer the plant into a 3-4 inch container. Loosen the roots and water well. I use the same soil mix.

Transplanting Tomato Starts
Whether the plant is in a milk jug or an indoor container, the transferring it to the ground is the same.
At least a week before the plant is transplanted, try to get the plant used to the outdoors. Open up the milk jugs or bring the pots outside and let them soak up the sun and get some wind on them. This strengthens the roots and acclimates the plant to the true sun rays. At night, bring in the plants or close the milk jugs.

Once it is time to transplant, prep the garden space by mixing in compost if the soil is nutrient deplete.
Tomatoes can be planted two ways. First is the typical way of digging a hole bigger than the pot and placing the plant inside. Making sure the roots are loosened and filling soil back in to the base of the plant. Water in well.
The second way is by digging more of a trench, then placing the plant on its side. Every node where the plant has leaves, a new plant with emerge above the soil. Make sure the top of the plant is not covered and is used as one of the plants to be grown. Fill the trench back in with soil and water in well.
If you are not sure if the soil has enough nutrients, use a fish emulsion fertilizer when the flowers start to bloom. Then every two weeks after the fruits start to grow.
Managing Tomatoes
When the tomatoes start to grow after transplanting outdoors, it is a good idea to prune the suckers off. Suckers are where the plant wants to grow a new plant off from the main stem. Follow the main stem up to the first leaf branch. At the elbow of the branch, where the branch and stem meet, a new plant will grow. You will see a small new branch growing. Cut these off. Unless you want a huge over grown plant.
As the plant grow, keep taking off the suckers. This puts more energy into producing tomatoes instead of branches.
The only exemption to this rule is with indeterminate tomato plants. Sometimes it can be difficult to find the suckers because they can look similar to the fruiting branch. Be careful to follow and check the branches.

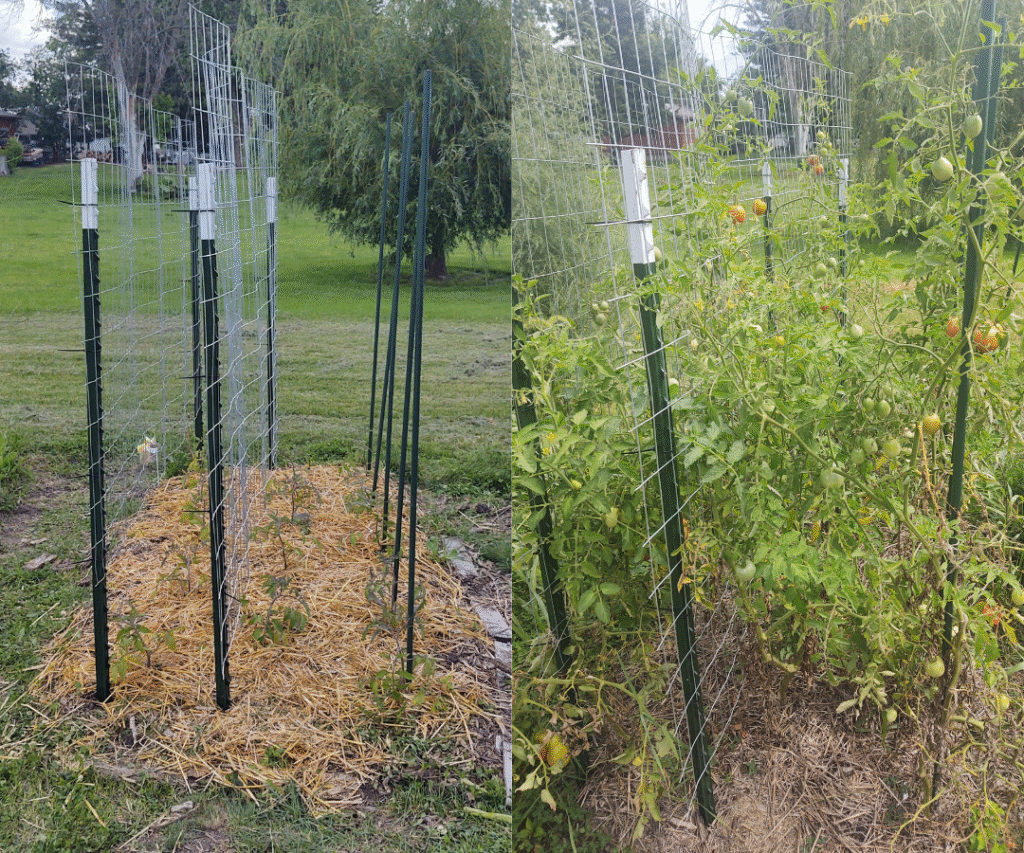
Provide strong supports, a clean debris-free ground and allow for good air circulation.
Water plants when the soil feels dry. While they need a lot of water, too much water at one given time while fruiting may cause a cracked fruit.
Harvesting Tomatoes
Harvest tomatoes when they are firm but slightly soft. Tomatoes shouldn't be green or hard when ripe, except for some rare varieties. Most tomatoes turn a shade of orange, pink, red or even purple when ripe. A fruit that is left on the branch too long with be soggy and possibly molded or bug eaten.
Tomatoes can be harvested green. Fried green tomatoes are a nice treat. Placing green tomatoes in the sun will ripen them up in time but the flavor might not be as delicious. Sometimes I end up with a lot of green tomatoes before the last frost and I will keep them to not waste any fruit. In time, they turn red.
Make sure to harvest tomatoes before the first frost. Frost will kill tomato plants and even weather that goes below 55 degrees is stressful for them.

Ideas for Preserving Tomatoes
I preserve tomatoes by making sauces, salsa, diced tomatoes, soup, dehydrated and cherry tomatoes in oil. I'll make fresh ketchup, bbq sauce and marinara. Possibilities are endless. Preserving tomatoes from your garden or some other kind souls can save you money. Plus, you know what is actually in the food you eat. Want to learn how to can a basic tomato sauce for pasta, pizza or marinara? Visit my canning tomato sauce page.

Seed Saving Tomatoes
To save tomato seeds, use a ripened tomato. Cut open the tomato. Scoop out the seeds. Place the seeds on a paper towel or parchment paper to dry. Once dry, place seeds in an envelope, label and date. Seeds can last up to 5 years in cool dry conditions.
Amazon Storefront
Wondering what I use at the homestead? I have created a storefront to show some of the items I buy from Amazon and use. I earn a small commission if you buy from my storefront. CLICK THIS LINK.


